Server hosting information
Why host a server?
Hosting a server has a few advantages (and disadvantages) over connecting to the game's
existing regional servers that players normally connect to. Now that the game's community has mostly
disappeared, these aren't as great, but this allows you to play with friends online even 100 years from now.
Advantages:
existing regional servers that players normally connect to. Now that the game's community has mostly
disappeared, these aren't as great, but this allows you to play with friends online even 100 years from now.
Advantages:
- Server-side disconnection when kicking players, "un-kickable" players are no longer an issue
- Access to IP addresses, ban players by IP so they can't just rejoin under a different name
- Potential for lower ping, players who live near your server can have low ping depending on your internet speed
- Server administration privileges, you & people you trust can have permission to kick, ban & more when not MC
Disadvantages:
- Your server's rooms won't show up in the regional ones, so you'll have to publicize your server's IP address somewhere
- Network & resource usage, as expected, on the computer running the server - still very good on performance however
Requirements
A fast computer and internet speed is recommended but you should be able to host a server regardless,
as long as you aren't on a cheap laptop found at a retail store & your ISP's ultra-low internet package.
___________________________________________________________
For players to be able to connect to your server, you'll need to allow the following ports through your router:
5055, 5056, 5057 (UDP)
4530, 4531, 4532 (TCP)
4520 (TCP)
843 (TCP)
If you don't know how to do that, google searching "how to port forward" will yield many results or
visit portforward.com which has router-specific instructions on how to do it.
Download
After downloading, right click on the .rar archive, go to properties, and ensure
that the file is not blocked before you extract it.
that the file is not blocked before you extract it.
Running the server
If you are using Windows XP...
...and have a 32-bit system, you will use the bin_Win32_xp folder
...and have a 64-bit system, you will use the bin_Win64_xp folder
...and don't know what you have, use the bin_Win32_xp folder
If you are not using Windows XP...
...and have a 32-bit system, you will use the bin_Win32 folder
...and have a 64-bit system, you will use the bin_Win64 folder
...and don't know what you have, use the bin_Win32 folder
Run PhotonControl (found inside the bin_Win folder you're told to use above) and a taskbar icon will appear,
warning you that there is no license file. Without a free license, you can only have 20 players on your server,
versus 100 if you get one. It only takes ~2 minutes to get the license so visit this page to see how to get one.
This application is just to control the server, the server is not actually running yet.
Click on the PhotonControl taskbar icon and make sure the server is set to use your public IP address:
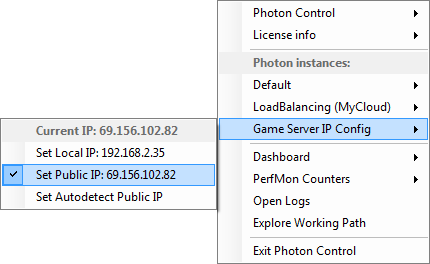
The public IP address you see is what players will connect to your server with.
The port for any server hosted by anyone will always be 5055.
To start up the server, go to the LoadBalancing (MyCloud) tab and press the Start as application button:
The port for any server hosted by anyone will always be 5055.
To start up the server, go to the LoadBalancing (MyCloud) tab and press the Start as application button:
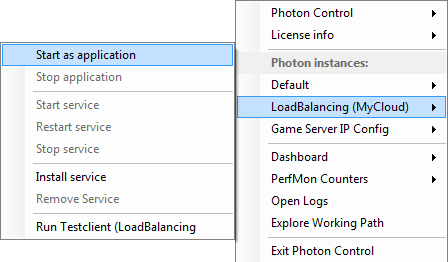
After a few seconds the server will be up and running! Players can now connect to your server
via the LAN page in-game and join rooms or create their own.
Please read the server administration section before you publicize your server.
via the LAN page in-game and join rooms or create their own.
Please read the server administration section before you publicize your server.
Stopping the server
After you've started the server, you can't just click Exit Photon Control to stop it. As said above,
PhotonControl just controls the server. You need to go to the LoadBalancing (MyCloud) tab
once again and press the Stop application button, then you can exit PhotonControl.
Note: For some reason this seems to not work randomly, so to be safe, open task manager and
manually end all processes related to Photon (they should all have 'photon' in the name).
Having a URL instead of an IP address
Instead of having to share your IP address, you can use a free service to set up a never-changing website
URL that will redirect to your IP address. For example, players can connect to myserver.domain.com. If you
want to do this, rather than having to share your IP address any time it changes, see this page for how to do it.
URL that will redirect to your IP address. For example, players can connect to myserver.domain.com. If you
want to do this, rather than having to share your IP address any time it changes, see this page for how to do it.
Server administration
With private servers you have the ability to have one or more "authentication levels" with different permissions.
If the server owner has shared an admin password with you (or you're the owner), you can use whatever permissions
a given level has when not the master client. Otherwise, when not authenticated, regular kicking and name banning
is still possible when the MC.
Inside the server folder, the following files will be found: authlevels.txt & authlevelperms.txt
____________________________________________________________________________
Inside authlevels.txt you define the password(s) for players to authenticate themselves with.
Each password is accompanied by a number (the level) which is then given permissions.
Level numbers must start at 0 and go up.
Inside authlevelperms.txt you define the permissions each level gets. If a permission requires level 0, only
someone who has the password with level 0 can use it. If a permission requires level 1, someone who sends
either the password for level 1 or 0 can use it. If an entry is missing, it will automatically require level 0.
The lowest level number, 0, is considered the highest level of authentication. If you're authenticated at level 0,
someone "below" you at level 1 is not able to kick you if they have kicking permission. However, since you're
at a "higher" level, you can kick them.
Make sure to change the passwords when you first download the server files! They are set to the example image below,
so if you don't touch these at all, anyone can show up and get permission to ban players from your server!
Example values:
so if you don't touch these at all, anyone can show up and get permission to ban players from your server!
Example values:
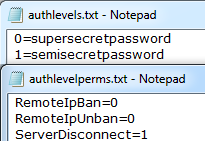
In this example, if a user sets 'supersecretpassword' as the admin password in the LAN page, they get permission for everything.
If a user uses 'semisecretpassword', they get permission to kick players from the server but nothing else.
So far, you can have permission to do server-wide IP banning (RemoteIpBan), removing IP bans (RemoteIpUnban),
server-side disconnects when kicking players (ServerDisconnect), restarting the game (RestartGame) and reviving
players (RevivePlayers), when not the master client & properly authenticated.
Server-side disconnect stops players from ignoring the kick event and immediately terminates their connection to the server. If they
are banned, the server will refuse to connect them when they try to connect in the LAN page.
Server configuration file
There's a super basic server configuration file called serverconfig.cfg you will find.
Currently it's only two features is to let you define the color & emphasis of in-game
server messages, like kicks, bans, and authentication messages, and define what
message it will send when someone uses the non-MC restart functionality.
The available color & emphasis tags you can use are the following:
<b> (which is bold text)
<i> (which is italic text)
<color=#RRGGBB> (which is colored text)
For the color tag, use websites like this to find colors. You'll end up with something
like FFCC00, which you place after the # character like so: <color=#FFCC00>
For example, the following line in the config file results in bold yellow text:
textFormattingTags=<color=#FFCC00><b>
Viewing the server's log files
This information isn't necessary to run your server at all.
However, it can show you statistics and notify you when someone gets IP banned/unbanned,
a banned player is trying to connect, or if you somehow broke something (unlikely to happen).
____________________________________
Click on the PhotonControl taskbar icon and then "Open Logs" which will open Baretail. If you haven't run your
server yet it'll be empty. If you have and it still is, go to File -> Open and open the log files. The log files are located
in a folder called log in the server's base folder. Open GSGame1.log, GSGame2.log and MSMaster.log.
The GSGame log files will display information about room-specific events, such as room creation & players joining.
MSMaster will display server-specific events such as the initial player-server connections and ban system events.
After these are open, in Baretail, press the "Highlighting" button at the top, and fill out the following elements to make
log viewing a little nicer on the eyes. You can choose your own colors.
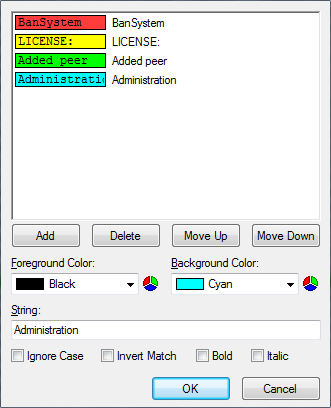
After you do this, lines in the logs that contain those strings will be highlighted so you can find them without having to strain your eyes.
